|
Thanks for using our site! |
Mining (Harvest Moon: Hero of Leaf Valley): Difference between revisions
imported>Chickadee Created page with "After doing the part time job with Rudolph at least five times, the mine becomes available for free use whenever you feel like it. There you can find precious minerals vital f..." |
imported>Chickadee No edit summary |
||
| (3 intermediate revisions by the same user not shown) | |||
| Line 1: | Line 1: | ||
[[Category:Harvest_Moon:_Hero_of_Leaf_Valley]] | |||
After doing the part time job with Rudolph at least five times, the mine becomes available for free use whenever you feel like it. There you can find precious minerals vital for upgrading your tools or giving to people as presents. You start out with access to one room only, but as time goes by new rooms with rarer metals open up for use. Here's a simple map of the mines: | After doing the part time job with Rudolph at least five times, the mine becomes available for free use whenever you feel like it. There you can find precious minerals vital for upgrading your tools or giving to people as presents. You start out with access to one room only, but as time goes by new rooms with rarer metals open up for use. Here's a simple map of the mines: | ||
<gallery> | |||
HM_HOLV_minemap.png|Mine Map | |||
</gallery> | |||
==Room 1 Unlock== | ==Room 1 Unlock== | ||
| Line 49: | Line 51: | ||
===Room 1=== | ===Room 1=== | ||
<gallery> | |||
HM_HOLV_room1-1.PNG|Room 1-1 | |||
HM_HOLV_room1-2.PNG|Room 1-2 | |||
</gallery> | |||
===Room 2=== | ===Room 2=== | ||
<gallery> | |||
HM_HOLV_room2-1.PNG|Room 2-1 | |||
HM_HOLV_room2-2.PNG|Room 2-2 | |||
</gallery> | |||
===Room 3=== | ===Room 3=== | ||
<gallery> | |||
HM_HOLV_room3-1.PNG|Room 3-1 | |||
HM_HOLV_room3-2.PNG|Room 3-2 | |||
</gallery> | |||
===Room 4A=== | ===Room 4A=== | ||
<gallery> | |||
HM_HOLV_room4a-1.PNG|Room 4A-1 | |||
HM_HOLV_room4a-2.PNG|Room 4A-2 | |||
</gallery> | |||
===Room 4B=== | ===Room 4B=== | ||
<gallery> | |||
HM_HOLV_room4b-1.PNG|Room 4B-1 | |||
HM_HOLV_room4b-2.PNG|Room 4B-2 | |||
</gallery> | |||
Latest revision as of 17:04, 23 June 2019
After doing the part time job with Rudolph at least five times, the mine becomes available for free use whenever you feel like it. There you can find precious minerals vital for upgrading your tools or giving to people as presents. You start out with access to one room only, but as time goes by new rooms with rarer metals open up for use. Here's a simple map of the mines:
-
 Mine Map

Room 1 Unlock
- Available: After working for Rudolph 5 times
- Items: Junk Ore, Limestone, Mineral Crystal, iron ore, copper ore, silver ore, gold ore, blue rock, orichalcon, rare metal, moonlight stone Rare item: Rare pot, mysterious clay doll, mysterious tool, Earthen vase
Room 2 Unlock
- Available: Summer 1st, year 1
- Items: Junk Ore, Limestone, Mineral Crystal, iron ore, copper ore, silver ore, gold ore, blue rock, orichalcon, rare metal, moonlight stone Rare item: Mysterious clay doll, mysterious tool, Earthen vase
Room 3 Unlock
- Available: Autumn 1st, year 1
- Items: Junk Ore, Limestone, Mineral Crystal, iron ore, copper ore, silver ore, blue rock, orichalcon, moonlight stone Rare item: Mysterious tool, Earthen vase
Room 4A Unlock
- Available: Winter 1st, year 1
- Items: Junk Ore, Limestone, Mineral Crystal, gold ore, orichalcon, moonlight stone Rare item: Mysterious clay doll
Room 4B Unlock
- Available: Winter 1st, year 1
- Items: Junk Ore, Mineral Crystal, rare metal, orichalcon, Blue rock Rare item: Earthen Vase
Room 5A Unlock
- Available: Winter, year 1 (after Mecha Mole event)
- Items: Junk Ore, sapphire, ruby, amethyst Rare item: Ammonite shell, trilobite fossil, plant fossil, fish fossil, rare pot, mysterious clay doll, mysterious tool, earthen vase
Room 5B Unlock
- Available: Winter, year 1 (after Mecha Mole event)
- Items: Junk Ore, sapphire, ruby, amethyst Rare item: Rare pot
Room 6 Unlock
- Available: Summer, year 2
- Items: Junk Ore, mineral crystal, aquamarine, Rare item: Earthen vase, mysterious tool
Smashing rocks
As you've probably observed there are ways to create combos with the rocks in the mines so that a chain reaction will destroy them all with a single blow. Yellow rocks can be pushed so that this can happen. Follow the patterns in the pictures below to achieve this:
Room 1
-
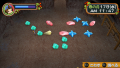 Room 1-1
-
 Room 1-2


Room 2
-
 Room 2-1
-
 Room 2-2


Room 3
-
 Room 3-1
-
 Room 3-2


Room 4A
-
 Room 4A-1
-
 Room 4A-2


Room 4B
-
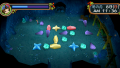 Room 4B-1
-
 Room 4B-2


